
Hiking with damaged boots can pose risks, but knowing how long you can safely continue is key. This guide explains the signs of damage, how to assess your boots, and when to replace or repair them. Learn practical tips to maximize safety and comfort during your outdoor adventures, even if your boots aren’t perfect.
Key Takeaways
- Assess the Damage: Regularly inspect your boots for tears, worn soles, or compromised support to determine how long you can hike.
- Minor Damage Tolerance: Small scuffs or minor sole wear may allow for a few more hikes, but monitor closely for worsening issues.
- Major Damage Risks: Large tears, broken eyelets, or significant sole separation can lead to injuries and should be addressed immediately.
- Duration Depends on Damage Severity: Light damage might be safe for a few hikes; severe damage should be replaced or repaired immediately.
- Practical Tips: Carry repair kits, waterproofing sprays, and extra laces to prolong your boots’ usability on the trail.
- When to Replace: If your boots cause pain, don’t provide support, or have irreparable damage, it’s time for new ones.
Quick Answers to Common Questions
Tip/Question?
How can I tell if my boots are too damaged to hike in?
Look for large tears, sole separation, or support loss. If these are present, it’s best to replace them.
Check the latest prices and available rooms before they sell out.
Tip/Question?
Can I hike with small cracks in the sole?
Minor cracks may be okay temporarily, but monitor them closely. If cracks deepen or widen, replace your boots.
Tip/Question?
How do I repair a torn waterproof membrane?
Use waterproof patch kits or consult a professional for more extensive repairs.
Tip/Question?
Is it safe to hike with loose laces?
No, loose or broken laces can cause instability. Always replace or tighten them before hitting the trail.
Tip/Question?
How long do hiking boots typically last?
Most high-quality hiking boots last about 500-1000 miles, but damage can reduce that lifespan.
Introduction
If you’re an outdoor enthusiast, you know the importance of good hiking boots. But what happens when your trusted boots get damaged? Can you still hike with them, and if so, for how long? This guide will help you understand how to assess your damaged boots, determine whether they’re safe to hike in, and how to extend their lifespan when repairs are possible. By the end, you’ll be equipped to make smart decisions that keep you safe and comfortable on the trail in 2026.
Understanding the Types of Boot Damage
Before deciding how long you can hike with damaged boots, it’s crucial to understand the different kinds of damage and what they mean for your safety and comfort.
Find the Best Accommodation Deals
Compare prices from multiple booking platforms and find the best option for your stay.
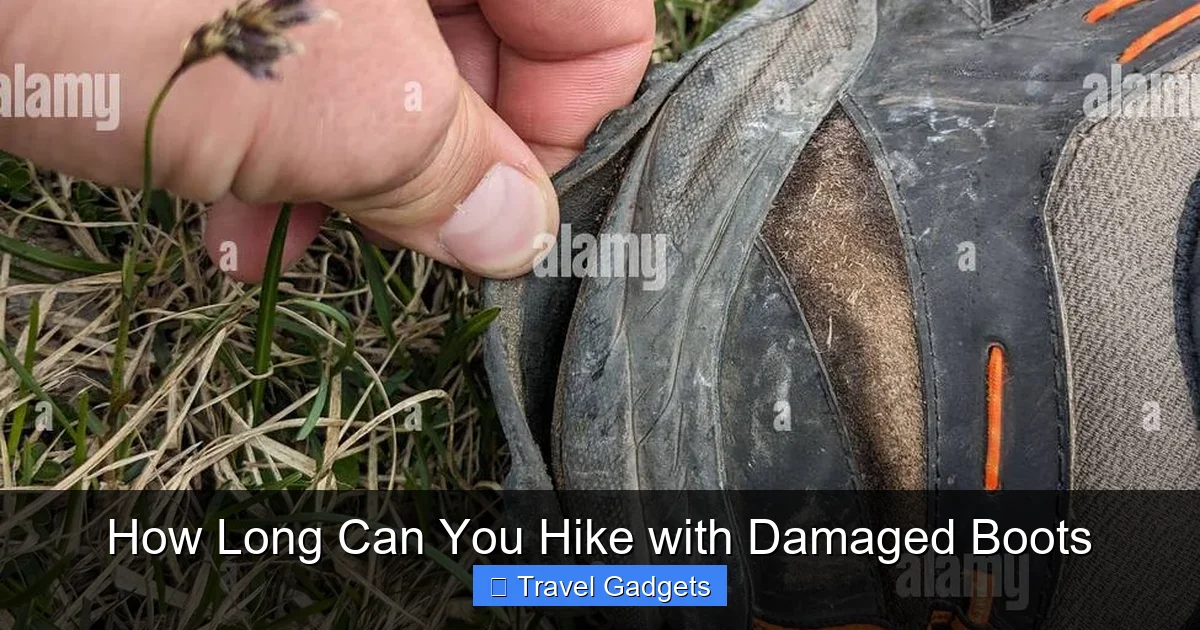
Compare Hotel PricesVisual guide about How Long Can You Hike with Damaged Boots
Image source: c8.alamy.com
Find the Best Accommodation Deals
Compare prices from multiple booking platforms and discover the best stay options available.
⭐ Trusted by thousands of travelers
💰 Budget to luxury options available
Common Damage Types
- Tears and holes: Usually occur in the upper material or waterproof membrane, affecting protection and water resistance.
- Worn soles: The outer sole wears down, reducing grip and shock absorption.
- Broken or loose eyelets/laces: Can cause difficulty in securing your boots tightly.
- Separation of sole and upper: The sole detaches partially or completely, risking instability.
- Cracks in the midsole or outsole: Compromise support and cushioning.
Step 1: Conduct a Thorough Inspection
Before heading out, always check your boots carefully. This helps you assess whether they are safe for your hike.
Visual guide about How Long Can You Hike with Damaged Boots
Best Stay Deals Available
Compare prices across top booking platforms and find the best deal for your stay.
Check Available RoomsImage source: justsimplywander.com
How to Inspect Your Boots
- Look for visible tears or holes: Examine the entire upper, especially around seams and stress points.
- Check the sole condition: Tap the sole with your finger to listen for detachment or looseness.
- Test the support: Flex the boots to see if the midsole or support structure is compromised.
- Inspect laces and eyelets: Ensure laces are intact and eyelets aren’t broken.
- Evaluate waterproofing: Splash water on the boots to spot leaks or worn areas.
Step 2: Determine the Severity of Damage
Based on your inspection, classify the damage as minor, moderate, or severe to decide how to proceed.
Visual guide about How Long Can You Hike with Damaged Boots
Image source: hikingguy.com
Minor Damage
- Small scuffs, superficial cracks, or slightly worn soles.
- Intact waterproofing and support.
Hiking with minor damage may be okay for short trips or local hikes, but monitor wear closely.
Moderate Damage
- Large tears, significant sole wear, or loose components.
- Noticeable loss of support or waterproofing.
These issues can become dangerous if ignored. Consider repairs or replacing boots soon.
Severe Damage
- Separation of sole and upper, broken support structures, or severe cracks.
- Boots are unsafe and should be replaced immediately.
Step 3: Decide How Long You Can Hike
Now, based on damage severity, you can estimate how long you can safely continue hiking with your damaged boots.
Hiking with Minor Damage
If damage is minor, you might get away with a few more hikes, especially if you take precautions. Keep an eye on wear and avoid rough terrain.
Hiking with Moderate Damage
Limit hikes to shorter distances or easier trails. Carry repair supplies and plan to replace or repair your boots soon.
Hiking with Severe Damage
It’s best to stop immediately and replace your boots. Continuing can lead to injuries like blisters, sprains, or falls.
Step 4: Practical Tips to Extend Your Boots’ Life
Even with some damage, you can prolong your boots’ usability with these tips:
Repair Small Tears and Holes
Use waterproof patches or adhesive to fix minor tears. Sewing or using boot repair kits can reinforce weak areas.
Replace or Tighten Laces and Eyelets
New laces or replacing broken eyelets restore support and fit, helping you hike safely longer.
Apply Waterproofing Products
Reapply waterproof sprays or waxes to maintain water resistance, especially if waterproofing has worn off.
Use Insoles and Support Inserts
If the midsole feels compromised, adding insoles can provide extra cushioning and support.
Carry a Repair Kit
Always bring a small repair kit on hikes: patches, glue, spare laces, and tools. They can fix minor issues on the trail.
Step 5: When to Replace Your Boots
Knowing when to replace your boots is crucial for safety. Consider replacing if:
- Persistent pain or discomfort during hikes.
- Significant structural damage that can’t be repaired.
- Loss of support or waterproofing that affects performance.
- Visible cracks or separation affecting stability.
Investing in new boots can prevent injuries and improve your hiking experience in 2026 and beyond.
Conclusion
Hiking with damaged boots isn’t ideal, but sometimes it’s unavoidable. Regularly inspecting your footwear, understanding the severity of damage, and knowing when to repair or replace are key to staying safe on the trail. With proper care and quick action, you can extend the life of your boots and enjoy many more adventures in 2026. Remember, your safety always comes first—don’t compromise it for the sake of saving old shoes.
Final Tips
- Always carry a basic repair kit when hiking.
- Replace boots when damage affects your safety or comfort.
- Invest in quality boots to reduce damage over time.
- Regularly check your gear before and after hikes.
🎥 Related Video: ✅ SURVIVAL SKILLS: Her Shoe Broke Deep in the Wild! 😱What We Did Next… #camping #outdoors #lifehack
📺 Planet 3 Outdoors
If your shoe broke in the wild—what would YOU do? Walking barefoot? Not today! While deep in the jungle, my wife’s shoe …